FBX Exporter
Export to FBX: Export Geometry
The FBX Exporter allows the user to export the geometry and forward kinematics of the components in FBX (Filmbox) format.
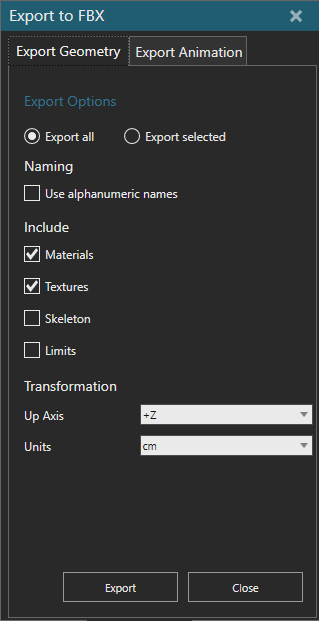
- On the HOME tab, in the Export group, click FBX.
- In the Export to FBX task pane, select the Export Geometry tab.
- Click Export all to export all components in the layout.
- Click Export selected to export only selected components.
- Enable Use alphanumeric names, to sanitize the names of the exported links. This option replaces any non-alphanumeric characters with the underscore character “_” in exported names to improve compatibility with third-party software, e.g. Autodesk Maya®.
- Under Include:
- Enable Materials to include the materials. Not all the materials supported in Visual Components are supported in FBX.
- Enable Textures to include the textures in the layout.
- Enable Skeleton to include the skeletal model of the components with non-fixed joints. The target application needs to support constraints.
- Enable Limits to include the limits of the joints. Custom joints support is limited. Rotation order is optimized for the rotation axis.
- Under Transformation:
- From Up Axis select the orientation of the model exported.
- From Units select the system unit of the model exported.
- Click Export, and then save the file.
Supported Geometry
- GeometrySets
- CompactLineSets
- Materials
- Textures
- 3D Text (exported as a mesh)
Known Limitations
- Rotational and translational follower are exported as independent joints. The original limits are used.
- Custom Joints are only supported in cases where there is a Rotation or Translation of one axis.
- Materials might differ on exported models.
- Point clouds are not supported by the FBX format.
Export to FBX: Export Animation
The FBX Animation Exporter allows the user to export animated geometry, and the forward kinematics of components in FBX (Filmbox) format.
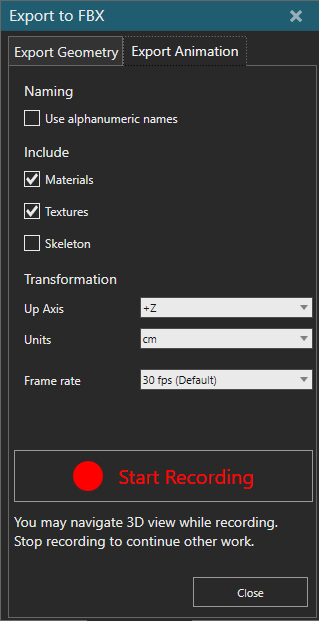
- On the HOME tab, in the Export group, click FBX.
- In the Export to FBX task pane, select the Export Animation tab.
- Enable Use alphanumeric names, to sanitize the names of the exported links. This option replaces any non-alphanumeric characters with the underscore character “_” in exported names to improve compatibility with third-party software, e.g. Autodesk Maya®.
- Under Include:
- Enable Materials to include the materials. Not all the materials supported in Visual Components are supported in FBX.
- Enable Textures to include the textures in the layout.
- Enable Skeleton to include the skeletal model of the components with non-fixed joints. The target application needs to support constraints.
- Under Transformation:
- From Up Axis select the orientation of the model exported.
- From Units select the system unit of the model exported.
- From Frame rate select the frame rate of the scene.
- Click Start Recording.
- To stop recording a simulation, click Stop from the Simulation controls or Stop and save from the Export Animation tab.
- Finally, define a file name and location for saving the recording.
Supported Geometry
- GeometrySets
- CompactLineSets
- Materials
- Textures
- 3D Text (exported as a mesh)
Known Limitations
- Unity: In some versions of Unity, visibility of objects may be incorrect. Observed in Unity version 2022.1.19f1.
- Autodesk Maya®: Components with shared materials may appear green in some circumstances.
- Microsoft 3D Viewer: FBX files might not function reliably.
- Blender: The FBX models are not skinned, so you will need to weight paint the models to use Pose Mode.