Hyundai Robot
Note: In addition to the setup information below, refer to the video lesson (in English) on the Visual Components Academy.
About the plugin
The Hyundai Robot plugin allows you to connect to a Hyundai Robot controller during simulation and exchange data. For example, a program running in a virtual or physical Hyundai controller can drive the joints of a Hyundai Robot in a simulation, read data from sensors, and set outputs for picking and placing products.
The plugin is associated with the Connectivity feature of Visual Components Premium and can connect to one or more Hyundai Robot controllers. The simplified workflow is the following:
- Add server
- Connect to the server
- Map variables
- Run the simulation
Terminology
- HRSpace – Offline programming software and simulator for Hyundai robots. It includes a virtual robot controller (VRC) and virtual teach pendant (Virtual TP) for Hi5, Hi6 and Hi7 controllers.
- OpenAPI – An API developed by Hyundai Robotics for reading and writing data with Hyundai Hi6 and Hi7 controllers.
Read and Write Support
Read and Write table
| Type | Read | Write | Notes |
| Robot controller digital inputs and outputs |
Yes |
Yes | Signals |
| Current joint values from any robot of the connected controller including additional axes |
Yes |
No | Per safety reasons |
Requirements
You must use a Hyundai robot controller that supports OpenAPI such as Hi6 and Hi7. Note that Hi5 controllers do not support OpenAPI, so trying to connect to one will fail in Visual Components.
Setup
Note: In addition to the setup information below, refer to the video lesson (in English) on the Visual Components Academy.
- Check that your host PC meets the requirements.
- Access the Hyundai Robot controller.
- In Visual Components, add a new server with the plugin and connect to the controller.
- Connect to the controller. Upon successful connection, you will receive feedback in the Output panel about the controller, its robots and I/O.
- Map the variables.
- Run the simulation.
- Simulate to start the exchange of data.
Note: In the Connected Variables panel, the Prepared value column can be used to set values for testing.

- Simulate to start the exchange of data.
Capabilities
You can verify the capabilities of the Hyundai Robot plugin and subsequent server connections in the Properties panel.
Plugin
- In the Connectivity Configuration panel, select Hyundai Robot.
- In the Properties panel, expand Connection Plugin Capabilities.
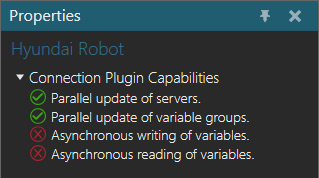
Server
- In the Connectivity Configuration panel, expand Hyundai Robot, and then select an active server connection.
- In the Properties panel, expand Server Capabilities.
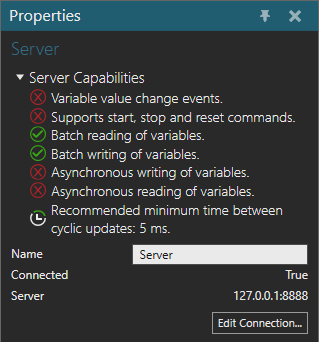
Connection Settings
A Hyundai Robot plugin connection requires a Hyundai robot controller to have an IP address and port number. Each connection in Visual Components is a client to the controller and not meant to remotely operate the robot.
Error handling
- If the connection to the controller is lost, the exchange of data will stop. Reconnect to the controller to fix this.
- If the connection to the controller fails but its IP address is reachable, check the controller version and port access. An attempt to connect to a Hi5 controller will fail since Hi5 does not support OpenAPI. Generally, port 8888 is used for the connection.
- If you do not see additional axes in the pairing editor, check the configuration on the controller. After resolving this on the controller, reconnect and refresh the pairing editor to browse the available axes.
- The controller via robot properties must know its total number of axes and specific number of additional axes.
- For example, a 6-axis robot with a travel axis and single-axis positioner would be configured as 8 axes in total, with 2 additional axes.
- Mechanisms in dependent relationships like a gantry are usually grouped together, whereas independent axes such as a positioner are in a separate group. Here is a quick reference on grouping logic:
- M0 – The robot body or arm
- M1 – Gantry (J7, J8, J9)
- M2 – Positioner (J10, J11)
- M3 – Jig (J12)
Limitations
Joint values cannot be written to the robot controller per safety reasons.
Compatibility
The Hyundai Robot plugin was developed using OpenAPI and supports a connection to any Hyundai robot that is compatible with that technology.
Supported data types
The Hyundai Robot plugin supports access to digital signals in function block (fb) groups and mechanical units joint data.
| Hyundai Robot Type | .NET Type |
| DigitalInput | System.Boolean |
| DigitalOutput | System.Boolean |
| Joint | System.Double |
Post Processing the Robot Program
Postprocessor
If you need to translate robot programs from your Visual Components model to the native controller, you can use the Postprocessor.
Note: The Postprocessor is available in the following products:
- Visual Components Premium
- Visual Components Premium OLP
- Visual Components Professional OLP
- Visual Components Robotics OLP
For more information on postprocessing using a Visual Components OLP product, see Translate robot program.
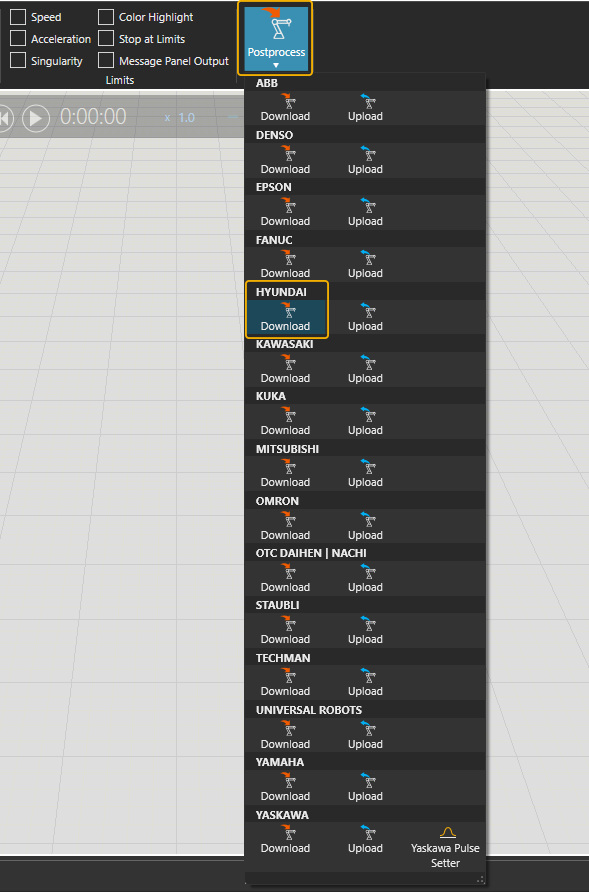
To translate the robot program for the real robot controller:
- Click the robot (or another device) which program you want to translate.
- Click Postprocess from PROGRAM ribbon tools.
- Click Download under the correct robot brand name.
- Browse the folder where you want to save the program file and give name for the file.
- Click Save.
- The file can be transferred to the robot controller.
Note: In real robots, run only the robot programs that are translated from calibrated models. Otherwise, there can be unpredictable collisions and errors when executing the program.
For more information check the Visual Components Robotics OLP robot brand specific manuals on the Visual Components OLP Extranet.