Test path
NOTE: This topic is only applicable to the following Robotics OLP products:
- Visual Components Premium OLP
- Visual Components Professional OLP
- Visual Components Robotics OLP
In Test Path section user can validate the weld path after the path is created and do the point modifications. The robot can be previewed in 3D window at every point in the welding path.
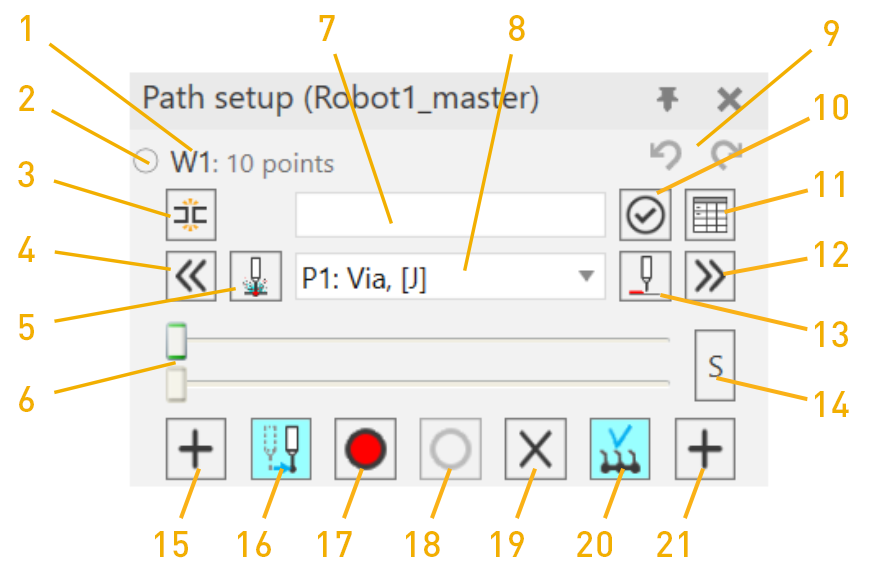
|
|
Name | Description | |
|
1 |
Number of the path | Number of the weld path. | |
|
2 |
Program status |
Set the Program status, see Program Status for details. |
|
|
3 |
Tool Solver |
Automatically Adjust tool angles and offsets to avoid Robot Tool colliding with the Workpiece, keeping the path in Full-Modify mode. See Tool Solver for details. |
|
|
4 |
Jump to first point |
Jump to the first point in the welding path. |
|
|
5 |
Jump to weld start |
Jump to the point where welding starts. |
|
|
6 |
Slider |
Slider for navigating between points on welding path. |
|
|
7 |
Name of the path | Name of the weld path. | |
|
8 |
Current point |
Current active point. The active point can be changed from dropdown menu OR by activating the field and scrolling with mouse scroll. |
|
|
9 |
Undo / redo |
Undo/redo option for path modification, allows to undo all changes that are done for the current path and redo all undone actions. Buttons become active after changes have been made to path or when an action is undone. |
|
|
10 |
Path check |
Open the path check panel, see Path check for details. |
|
|
11 |
Point control |
Opens point control window, see Point control for details. |
|
|
12 |
Jump to last point |
Jump to the last point in the welding path. |
|
|
13 |
Jump to weld end |
Jump to the point where welding ends. |
|
|
14 |
Slider interpolator |
Click the S option (turns blue) to jog robot with slider smoothly through the intermediate path between two points |
Turn off the S option by clicking(turns grey) to jog robot with slider only from point to point and not in the intermediate path |
|
15 |
Add point before |
Add a new point before the current one. |
|
|
16 |
Jump robot to point |
Moves the robot at selected point in simulation window |
|
|
17 |
Touch up |
Touch up the current TCP position and orientation to active point. To move the point, jog the robot to desired position and do touch up. |
|
|
18 |
Undo touch up |
Undo the touch up at active point. |
|
|
19 |
Delete point |
Delete the active point |
|
|
20 |
Full mode |
Applies the path parameters to all the points in the path instantly when modified from the different tabs in the path setup. |
|
|
Single mode |
Applies path parameters to a selected point in the path. |
||
|
Multi-mode |
Applies path parameters to all the points in the path except the point which is modified with the single point change option |
||
|
21 |
Add point after |
Add a new point after the current one. |
|


Note: Add or delete points or do touch ups only after you have modified all the settings at path setup tabs. Otherwise, modifying the settings after touch up, for example, rebuilds the path and deletes the point modifications (e.g. the touch up).